- Top Pick: CORSAIR Vengeance LPX DDR4 RAM 32GB (2x16GB) Up to 3200MHz CL16-20-20-38 1.35V Intel XMP AMD EXPO Computer Memory – Black (CMK32GX4M2E3200C16)
- Best Value: JEYI RAM Heatsink Cooler with Thermal Pads for DDR3 DDR4 DDR5, White 2-Pack
- Premium Choice: Desktop Memory RAM Cooler Heat Sink Pure Copper for DIY PC Game Over Clocking MOD DDR DDR2 DDR3 DDR4 – Pack of 2
Overclocking your RAM used to be a niche hobby reserved for benchmark chasers, but in 2026 it’s one of the easiest ways to squeeze more frame rate and smoother 1% lows out of a modern gaming rig without spending a dollar. Enabling XMP or EXPO alone can bump effective bandwidth by 15-20% over JEDEC defaults, and pushing further with manual timings can add another few percent in CPU-bound titles.
The catch is that RAM overclocking stresses your memory controller, VRMs, and DIMM thermals simultaneously, so doing it “safely” means understanding voltage limits, temperature headroom, and how to back out of a bad setting before it corrupts your OS install. This guide walks through the process step by step and points out the hardware that makes stable overclocks easier to reach.
As an Amazon Associate we earn from qualifying purchases at no extra cost to you.




⚡ Save on Your Next PC — Amazon Prime
Prime members get fast free shipping on the systems above, plus early access to Prime Day & Black Friday PC deals. New members get a 30-day free trial.
Watch: How to Overclock Your RAM Safely — Video Review
Start With the Right Kit
Overclocking headroom is determined largely by the memory chips (the “bin”) on your sticks, not just the label speed. Buying a kit that’s already rated above JEDEC baseline gives you a safety margin to work with.
- DDR4 gamers still on AM4 or older Intel platforms get excellent value from the CORSAIR Vengeance LPX DDR4 32GB (2x16GB) 3200MHz CL16 kit, which uses 1.35V and has enough Samsung/Micron headroom to often hit 3600-3800MHz with tightened sub-timings.
- Budget-focused DDR4 builders can consider the Acclamator 32GB 3200MHz CL18 kit, which ships with a basic heatsink and XMP profile out of the box, though its looser CL18 timings mean less latency headroom than the Vengeance LPX.
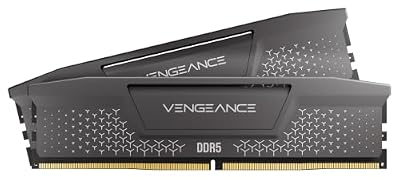
- DDR5 platforms on AM5 or Intel 12th-gen and newer should look at CORSAIR Vengeance DDR5 32GB (2x16GB) 6000MHz CL36, which supports both EXPO and XMP 3.0 and has proven stable up to 6400-6600MHz on many boards with an SoC voltage bump.
Understand XMP and EXPO Before Going Manual
Before touching manual timings, always start with the built-in profile. It’s the manufacturer’s validated baseline and the safest overclock you can apply.
- Enter your motherboard’s UEFI/BIOS and enable XMP (Intel) or EXPO (AMD) under the overclocking or memory menu.
- Reboot and run a quick stability check. This confirms your board and CPU’s memory controller can handle the rated speed before you push further.
- Note the applied voltage, typically 1.35V for DDR4 kits like the CORSAIR Vengeance LPX, or around 1.35-1.40V for DDR5 EXPO/XMP profiles on the Vengeance DDR5.
Push Frequency and Timings Incrementally
Manual overclocking is a game of small steps and repeated validation, not one big jump to your dream number.
- Raise memory frequency in increments of 100-200MHz on DDR4 or 200-400MHz on DDR5, testing stability at each step.
- Only after frequency is stable, tighten primary timings (CAS, tRCD, tRP, tRAS) one click at a time.
- Use a tool like Karhu RAM Test or TestMem5 for 30-60 minutes per step, and follow with a full boot cycle to catch settings that pass memory tests but fail on cold boot.
- Keep DRAM voltage under 1.45V on DDR4 and under 1.45V on DDR5 for daily use; going higher accelerates degradation without proportional performance gains.
Manage Heat Before It Manages You
Overclocked memory chips run hotter, and heat is the most common cause of “stable at idle, crashes under load” overclocks. DDR5 in particular runs warmer than DDR4 at the same voltage due to the onboard PMIC.
- If your kit lacks tall heatsinks, add-on coolers like the JEYI RAM Heatsink Cooler with thermal pads (DDR3/DDR4/DDR5, 2-pack) or the pure copper Desktop Memory RAM Cooler (2-pack) can drop DIMM surface temps by 5-10°C under sustained load.
- For tighter cases or dense builds, a dedicated fan-cooled solution such as the Thermals DDR4 RAM Cooler with PWM fan control lets you dial airflow up during stress testing and down for quiet daily use.
- Make sure case airflow crosses the DIMM slots directly; memory sitting in dead air near the top of a case will throttle or error out well before the CPU or GPU show any thermal warnings.
Validate Stability Like You Mean It
An overclock that “boots fine” is not the same as one that’s stable for gaming, streaming, or long Discord sessions.
- Run Karhu RAM Test to at least 2000% coverage, or TestMem5 with the Anta777 Extreme config, before trusting the settings.
- Follow memory-specific testing with a mixed CPU/GPU load like a game benchmark loop to catch controller instability that pure memory tests miss.
- Watch for WHEA errors in Windows Event Viewer even if the system doesn’t crash outright. They’re an early warning sign of marginal stability.
Tips
- Always save your baseline (stock/XMP) settings profile in BIOS before experimenting, so you can revert instantly if a test fails.
- Increase SoC voltage (AMD) or VCCSA/VCCIO (Intel) modestly when pushing DDR5 past EXPO speeds. Insufficient controller voltage causes more instability than insufficient DRAM voltage.
- Label or screenshot every stable configuration you find. Silicon lottery means your exact numbers won’t transfer to someone else’s kit, but your own history is gold for troubleshooting.
- Never overclock RAM and CPU at the same time when hunting for instability. Isolate variables so you know exactly what caused a failed test.
Frequently Asked Questions
Can overclocking RAM damage it permanently?
Yes, but it’s uncommon at reasonable voltages. Staying below 1.45V and keeping DIMM temperatures under roughly 55°C makes long-term degradation unlikely. Most failures come from excessive voltage combined with poor cooling, not overclocking itself.
Is DDR5 harder to overclock than DDR4?
It’s different rather than strictly harder. DDR5’s on-die voltage regulation and higher stock speeds mean gains are smaller in percentage terms, but the memory controller and SoC voltage tuning matter more than with DDR4, where DRAM voltage was the primary lever.
Do I need aftermarket coolers if my RAM already has heatsinks?
Stock heatsinks on kits like the Acclamator or CORSAIR Vengeance handle rated speeds fine. Once you push well past XMP/EXPO, especially with voltage increases, added cooling like copper heatsinks or a PWM fan cooler reduces thermal throttling risk during extended sessions.
What’s a realistic overclock gain for gaming?
Expect 3-8% higher average frame rates and a noticeably smoother 1% low in CPU-limited titles when moving from JEDEC defaults to a tuned XMP/EXPO profile with tightened timings. GPU-bound titles at 4K will see far less benefit.
Conclusion
Safe RAM overclocking in 2026 comes down to three habits: start from a well-binned kit, move in small validated steps, and respect thermal and voltage limits rather than chasing the highest number you can boot into. Whether you’re running a DDR4 CORSAIR Vengeance LPX kit or a DDR5 Vengeance kit at 6000MHz, the same discipline applies. Test thoroughly, cool adequately, and keep a fallback profile ready so every experiment stays reversible.