As an Amazon Associate we earn from qualifying purchases
Building the best Windows 98 gaming PC in 2026 is not about buying a new retro computer off a shelf. No major maker sells a new Pentium III system today, and period graphics and sound cards are used-market parts. What you can buy new on Amazon US, reliably, is the storage and imaging layer that makes an old platform usable every day: a CompactFlash card that behaves like an IDE hard drive, a proper IDE adapter to mount it, and a USB bridge to prepare and back it up from a modern PC.
You source a compatible used motherboard, CPU, RAM, and graphics card, then finish it with new storage below. The result boots quietly and can be cloned or restored in minutes if an install goes wrong. If you prefer software, see our guide to PC 98 emulators and retro play options.
Which OS version this guide uses
Use Windows 98 Second Edition, usually called Windows 98 SE. Do not start with the original 1998 release if you can avoid it. Windows 98 SE has better built-in support for AGP graphics, USB, and Windows Driver Model drivers, most late-era drivers were written with 98 SE as the target, and community guides and driver archives almost always assume 98 SE.
You need a legally obtained Windows 98 SE CD, or a disc image made from a disc you own, plus its product key. This guide does not cover downloading the operating system from unofficial sources.
Applicability conditions:
- Your motherboard has a standard 40-pin IDE/PATA controller, a BIOS that can detect a drive in LBA mode, and Windows 98 SE drivers for its chipset, graphics, and sound.
- Best fit is late Slot 1, Socket 370, and early Socket A platforms from roughly 1998 to 2001, with 128 MB to 384 MB of RAM.
- It does not apply unchanged to modern UEFI-only PCs, laptops without IDE, or boards that only boot from SATA or NVMe. Those are better served by emulation.
- Keep RAM at or below 512 MB for a straightforward install. Windows 98 SE can become unstable with more memory unless you apply system file edits, which are outside a first build.
- Keep the first partition modest. A single 8 GB boot volume avoids most BIOS geometry and partitioning problems on older boards.
What to buy new, and what to source used
Source used, after checking for leaking capacitors, bent pins, and a working BIOS screen: a 440BX, Intel 815, or VIA Apollo Pro motherboard; a matched Pentium III-class CPU; PC100 or PC133 SDRAM; an AGP graphics card with 98 SE drivers such as GeForce 2, GeForce 4 MX, or Voodoo3-class; a PCI sound card with 98 SE drivers; an ATX case and power supply; a PS/2 keyboard and mouse; and a monitor that accepts low game resolutions.
Note: those period parts are not genuinely sold new on Amazon US consistently — many listings are used or third-party with unclear condition. The new components below are genuinely listed on Amazon US and solve the most common failure point, the hard drive.
1. Transcend 8GB CompactFlash 133 Memory Card — TS8GCF133 (ASIN: B000W05O5O)

This is the boot drive. The Transcend CF133 8 GB card, model TS8GCF133, uses MLC NAND flash and supports Ultra DMA transfer mode 4, with Transcend listing read performance up to 50 MB/s and write performance up to 20 MB/s. The important trait is not peak speed. CompactFlash in ATA mode speaks the IDE protocol natively, so through a passive adapter the motherboard sees it as a normal IDE disk.
Why 8 GB? It holds Windows 98 SE plus a healthy game library, yet most period BIOSes size it without geometry confusion, and backups stay fast.
Verification: confirm the model number reads TS8GCF133 and capacity 8 GB. Do not substitute an unbranded card, which may not report as a fixed disk — that detail can decide whether Windows 98 will partition and boot from it.
2. StarTech.com 3.5-inch Drive Bay IDE to Single CF SSD Adapter — 35BAYCF2IDE (ASIN: B000T9QQP0)

This adapter, model 35BAYCF2IDE, mounts in a 3.5-inch drive bay and connects a CompactFlash Type I or II card or IBM Microdrive to a 40-pin or 44-pin IDE host. StarTech describes it as a quick, driver-free installation, which matches how CF-to-IDE should work: there is no bridge driver to install in Windows 98 SE, because the adapter presents an IDE device to the controller.
The bay form factor beats a bare board adapter: cables route normally and you can swap the card for imaging without leaving a board dangling from a ribbon cable.
Verification: confirm model 35BAYCF2IDE, a free 3.5-inch bay, the required power connector, and a free IDE channel set correctly as master or slave.
3. Unitek USB 3.0 to IDE and SATA Converter (ASIN: B00EHDTRJ6)
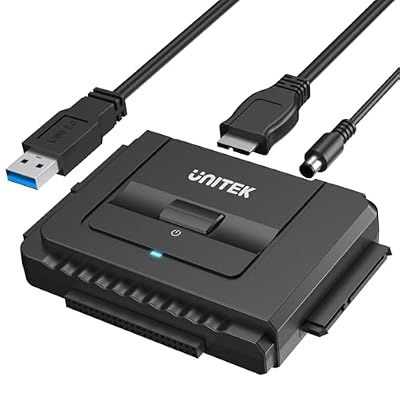
This is the modern-side tool, not a part that lives inside the retro PC. The Unitek converter provides dual-head IDE connectors for 40-pin and 44-pin drives plus a SATA connector, works through USB 3.0 with backward compatibility to USB 2.0 and 1.1, and includes a 12 V 2 A power adapter for 3.5-inch drives. Its listed features include plug and play use, an on/off switch, and an LED for power and activity.
Use it to make and restore full images of your working CF card from a modern PC. If a driver breaks the system, restore the image instead of reinstalling.
Verification: confirm both 40-pin and 44-pin IDE heads and the included power adapter. A SATA-only adapter is not a substitute — it cannot talk to IDE.
Step-by-step build and setup
Work on a static-safe surface, with the retro PC unplugged.
Step 1: Inspect the used platform. Fit CPU, cooler, and RAM. Connect only power supply, graphics card, monitor, and keyboard. Power on and enter the BIOS.
Verification: you should see a BIOS screen, the correct CPU description, and the full installed RAM counted. If any are wrong, stop and fix the platform first. Do not install Windows on a board that is not stable in BIOS.
Step 2: Confirm drivers in advance. Confirm you have Windows 98 SE drivers for chipset, graphics, and sound before you begin.
Verification: write the driver names on a checklist and tick each one as you confirm it. Missing chipset or sound drivers are the most common reason a finished build feels unfinished.
Step 3: Fit the CF storage. Insert the Transcend card fully into the StarTech bay adapter. Mount the adapter in the bay. Connect a known-good IDE cable from the primary IDE header to the adapter, respecting the pin-1 stripe, and connect power. Set the card as primary master if it will be the only drive.
Verification: the card seats without force, the bay screws hold the adapter without flexing it, and the IDE cable is not reversed. A reversed cable is a classic cause of a no-boot that looks like a dead drive.
Step 4: Confirm BIOS detection. Enter BIOS setup, set the primary IDE device to Auto, and enable LBA mode where offered.
Verification: the BIOS should report a drive on the primary channel with a capacity close to 8 GB. A blank entry or a tiny incorrect size means reseat the card, try the other cable connector, or test the card in a modern reader before proceeding.
Step 5: Install Windows 98 SE. Boot from your Windows 98 SE CD or a bootable disc prepared from your own media. Partition the CF card as a single primary FAT32 partition, format it, and run Setup.
Verification: after the first reboot, deprioritize the CD so the machine boots from the CF card. You should reach the Windows 98 desktop without a disk error. If Setup loops back to the CD, change boot order in BIOS rather than reinstalling.
Step 6: Install drivers in order. Install chipset drivers first, reboot, then graphics, reboot, then sound, reboot, then any network or USB drivers.
Verification: after each reboot, open Device Manager. The number of unknown or flagged items should fall step by step. Installing everything in one pass without reboots hides which driver caused a problem.
Step 7: Test a game. Set the desktop to 800 x 600 or 1024 x 768. Install one game you own, matched to your graphics card.
Verification: the game should launch, display without corruption, play sound through the correct device, save and load, and exit cleanly to the desktop.
Step 8: Back up immediately. Shut down, remove the CF card, and use the Unitek converter chain or a CF reader on your modern PC to make a full image of the card. Store two copies in different places, labeled with the date and driver set.
Verification: check the image file size is plausible for the card, and run your imaging tool’s verification if it offers one.
How to revert or undo changes
Every change here is reversible if you keep the image from Step 8.
- Undo a bad driver or game install: shut down, restore the verified CF image to the same card, reinsert it, and boot. Verification: the desktop returns exactly as before, and Device Manager shows the pre-change state.
- Undo the CF swap entirely: power off, disconnect the adapter’s IDE and power cables, remove the bay adapter, and refit your previous IDE hard drive with its original master or slave setting. Verification: the BIOS redetects the old drive with its original capacity.
- Undo a BIOS change: note any setting, such as boot order or LBA mode, before changing it. To revert, re-enter BIOS and restore the noted value, or load defaults and reapply only recorded settings. Verification: the machine boots to the same device as before the change.
- Undo the whole build: no soldering, firmware flashing, or case modification is required by this guide. Remove the new storage parts and the platform returns to its prior configuration.
Do not format your only CF card to try a different operating system. Clone it first, or use a second card.
Troubleshooting
If the BIOS sees no drive, reseat the card, confirm pin-1 orientation, and test it in a modern reader. If the system will not boot after install, check boot order and that the partition was made active. If a game has no sound, check Device Manager first — usually a sound driver issue, not the game. If adding RAM causes instability, return to the last known-good total at or below 512 MB.
Final verdict
The best Windows 98 gaming PC today is a carefully checked period platform finished with new, reliable storage. The Transcend CF133 is a right-sized boot medium that speaks IDE natively, the StarTech bay adapter mounts it like a real drive, and the Unitek converter makes recovery routine. Use Windows 98 SE, verify each step, and back up as soon as the machine works.