Xemu is a low-level emulator: it does not simulate an Xbox, it boots one. So it needs the same startup files a real console uses, and the hard disk image causes the most confusion, because it is a complete virtual drive: partitions, a dashboard and your saves inside a single file.
As an Amazon Associate, we earn from qualifying purchases.
This guide walks through the setup end to end: what each file does, where the image comes from, how the dashboard gets onto it, why the EEPROM must match your console, and the two failure modes behind most failed first setups.
This article contains an affiliate link, and the site may earn a commission if you buy through it, at no extra cost to you.
Quick Answer
Xemu needs four machine files, all dumped from your own Xbox: the MCPX boot ROM, a BIOS that can boot unsigned software, an EEPROM file, and a hard disk image. For the image, use the project’s pre-built image with its unsigned dashboard, image your console drive, or build one from scratch, then copy your dashboard files onto its C partition with a FATX drive tool.
The Four Machine Files, and Why Each Exists
A real Xbox runs four layers of code and data before a game starts, and Xemu mirrors all four. Per the project’s documentation, the first three are non-negotiable; the EEPROM rounds out the set.
- MCPX boot ROM image. The first code the console executes, from the MCPX chip. The documentation publishes the checksum of a correct dump and warns that a bad dump, off by a few bytes, will not work. It must come from a 1.0 console.
- Flash ROM image (BIOS). The kernel the boot ROM hands over to. One catch matters: because key DRM functions are unimplemented in Xemu, an unmodified retail BIOS cannot boot games. You need a debug BIOS or a modified retail BIOS that boots unsigned software, from your own hardware.
- EEPROM file. A tiny file holding your console’s identity and settings. Xemu creates a default if you supply none, but your own EEPROM is what makes your saves and drive behave as yours.
- Hard disk image. The virtual drive the console boots its dashboard from and saves to. This is the file the rest of this guide is about.
Every file has exactly one legitimate source: your own physical Xbox. The project endorses no other source, and neither does this guide.
The Hard Disk Image: Three Ways to Get One
Xemu’s documentation offers three routes to a hard disk image, and they trade authenticity against effort.
The pre-built image. The project provides a pre-formatted 8 GB image with no copyrighted content at all. Instead of the official dashboard it carries a basic unsigned dashboard, enough to boot, launch games and manage saves. For most people this is the right start: select it in Xemu’s system settings and the machine side is done.
Image your own drive. The most authentic route. Unlock your console’s hard drive, connect it to a PC with an IDE-to-USB adapter, and copy the drive, sector by sector, into a single file. Xemu can use that file as-is, complete with your dashboard, saves and settings, because it is your drive.
Build one from scratch. Drive-building tools can create a fresh image and format its partitions, after which you populate it yourself. Take this route for a clean image with your own dashboard, without cloning an aging drive whole.
Whichever route you choose, keep the image on fast, writable, local storage. The console writes to it constantly, and a read-only or network location is a quiet source of save failures.
What Is Inside the Image: The Partition Layout
An Xbox hard disk uses fixed partitions, and knowing them makes every later step obvious:
- C partition (roughly 500 MB): the dashboard lives here. The console boots to its menu by running the dashboard files from C.
- E partition (roughly 4.8 GB): user data. Game saves sit in its UDATA and TDATA folders, alongside ripped music.
- X, Y and Z partitions (roughly 750 MB each): cache drives that games use as scratch space and may clear without asking.
Two facts follow. First, the pre-built image’s basic dashboard is not a defect: its C partition holds a different, unsigned dashboard. Second, saves live inside the image, so backing it up backs up every save on it.
Putting a Real Dashboard on the Image
If you want the original dashboard rather than the pre-built image’s basic one, the files must come from your own console, and the transfer tool is a FATX drive utility: a program that understands the Xbox’s FATX filesystem and can open an image or a physical drive and browse its partitions.
The workflow is the same whether you cloned your drive or built a fresh image:
- Open your console’s drive (or its clone) in the FATX tool and copy the dashboard files off its C partition.
- Open the target image Xemu will use.
- Copy those dashboard files onto the target image’s C partition, in the same layout.
- Point Xemu at the finished image and boot with no game loaded. You should land in the real dashboard.
Do not overwrite a working image while experimenting. Keep the untouched pre-built image aside as a known-good fallback.
The EEPROM: Small File, Whole Identity
The EEPROM is the smallest machine file and the easiest to underestimate. It stores your console’s region, language, video and audio settings, its clock and network identity including its MAC address, and the hard drive key the drive’s lock password is derived from.
Three consequences follow. First, a mismatched EEPROM breaks the console-drive pairing: the drive unlocks with a key computed from the EEPROM, so an image cloned from one console and an EEPROM from another do not belong together. Second, some saves are tied to the console that created them through the EEPROM and its drive key, so saves carried over from your console need its EEPROM to keep working. Third, two Xemu instances with identical EEPROMs share a MAC address and cannot see each other in System Link play.
Xemu generates a default EEPROM if you provide none, which is fine for a fresh start with the pre-built image. But if any part of your setup comes from your real console, bring its EEPROM along. One documented trap: enabling surround sound in the EEPROM crashes Xemu, because that feature is unimplemented. Leave it off.
First Boot: Checks and the Two Failure Modes
Boot with valid files and no game loaded. Almost every setup problem presents as one of two symptoms, and they point at different files.
Symptom one: a blank screen, or the documented “guest has not initialized the display” error. This is a boot-file problem, not a disk problem. The project’s FAQ attributes it to missing, mismatched or corrupt MCPX and BIOS images. Check that both files are selected, that they come from a 1.0 console, that the MCPX dump matches the published checksum, and that the BIOS is a debug or modified build, not a stock retail dump.
Symptom two: the console’s service error screen, with an error number. The console booted far enough to complain about its drive, so check the image and dashboard. Usual causes: an unreadable image, a C partition with missing dashboard files, or an EEPROM and drive pairing that do not match. The fastest test is to swap in the untouched pre-built image: if the machine boots to its basic dashboard, your other image is the problem, not your boot files.
Once it boots cleanly, back up the whole set: copy the folder holding your MCPX, BIOS, EEPROM and image somewhere safe, and back the image up again after any session whose saves matter.
Hardware for the Job
EYOOLD USB 3.0 to SATA/IDE Adapter
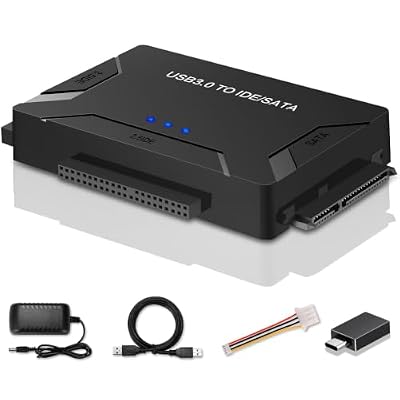
The bridge between your console’s IDE drive and your PC for the imaging route.
Specs:
- Interface: USB 3.0 host side; SATA and IDE drive side
- Drive support: 2.5-inch and 3.5-inch HDD/SSD, plus 5.25-inch optical drives
- Power: 12V power supply included, which a 3.5-inch IDE drive requires
- Drive capacity support: up to 6 TB per the maker
Xbox Wireless Controller (Carbon Black)

The original Xbox controller’s layout maps naturally onto the modern Xbox pad, sticks and triggers included, over Bluetooth or USB-C.
Specs:
- Model: QAT-00001
- Connectivity: Bluetooth and USB-C
- Features: hybrid D-pad, textured grips, Share button
Samsung 990 PRO 2TB NVMe SSD
Fast local storage for a library of disc images plus the hard disk image itself.
Specs:
- Interface: PCIe 4.0 x4, NVMe, M.2 2280
- Sequential read: up to 7,450 MB/s as stated by the maker
- Capacity: 2 TB
Samsung T7 Portable SSD 1TB
The backup target for the machine folder: small, and fast enough that copying an 8 GB image takes moments.
Specs:
- Interface: USB 3.2 Gen 2
- Sequential read: up to 1,050 MB/s as stated by the maker
- Capacity: 1 TB
WD Elements Desktop 14TB External Hard Drive
Bulk archive storage for drive clones and a growing disc-image library, where capacity beats speed.
Specs:
- Model: WDBWLG0140HBK-NESN
- Interface: USB 3.0
- Capacity: 14 TB
- Form factor: desktop, externally powered
How to Choose
Start with the pre-built image unless you have a specific reason not to: it is the only route requiring no console hardware work. Choose imaging when your console’s saves and dashboard matter and you are comfortable unlocking and connecting its drive. Choose the from-scratch build for your own dashboard on a clean image, without cloning an old drive whole. Either way, decide the EEPROM question at the same time: anything sourced from your console pairs with its EEPROM.
Who Should Skip
Skip this setup entirely if you do not own an original Xbox: the MCPX and BIOS files have no legitimate source other than your own console. Skip the drive-imaging route if your console’s drive is failing; imaging a dying drive is a recovery task, not a setup step. And skip Xemu for now if you expect the whole library to run flawlessly: compatibility varies by title however carefully the machine files are set up.
FAQ
Do I need a modified BIOS for Xemu?
Yes, for playing games. The project documents that an unmodified retail BIOS cannot boot games because key DRM functions are unimplemented. A debug BIOS or a modified retail BIOS that boots unsigned software, from your own hardware, is required.
Can I use the pre-built hard disk image forever?
Yes. It is a complete, functional image whose only limitation is its basic unsigned dashboard instead of the original one. Adding your own dashboard is a preference, not a requirement.
Why do my console saves not work in Xemu?
Some saves are tied to the console that created them through its EEPROM and drive key. Bring the EEPROM file along with the hard disk image so the pairing stays intact.
Xemu shows a service error screen. What broke?
Usually the hard disk image or the dashboard on its C partition: a corrupt image, missing dashboard files, or a mismatched EEPROM. Test with the pre-built image to isolate whether the fault is the image or your boot files.
Final Verdict
The hard disk image is the heart of a Xemu setup, and it rewards being treated as a real drive: pick one of the three documented routes, keep its EEPROM pairing intact, and back the machine folder up. Do that, and the errors that stall most first attempts become diagnosable checks instead of dead ends.