A loud gaming PC is usually fixed by identifying which fan is making the noise (GPU, CPU cooler, case or power supply), cleaning dust, resetting the fan curve so fans do not ramp for every short load spike, and replacing any fan that rattles or grinds. If temperatures are normal and the noise is a buzz rather than airflow, you may be hearing coil whine, which is a different problem with different fixes.
Quick diagnosis: what kind of noise is it?
| Symptom | Likely cause | First fix |
|---|---|---|
| Steady loud whoosh under load | Fans at high speed because of heat | Clean dust, improve airflow, adjust the fan curve |
| Fans surge up and down at idle | Aggressive fan curve reacting to brief spikes | Add hysteresis or smooth the curve in BIOS or software |
| Rattle or ticking | Loose screw, cable touching a blade, worn bearing | Tidy cables, tighten mounts, replace the fan |
| Grinding or clicking | Failing bearing | Replace the fan |
| High-pitched buzz that changes with frame rate | Coil whine | Cap frame rate, try other settings, contact the maker if severe |
| Hum or vibration from the case | Resonance in panels or drive | Add dampening, tighten panels, secure drives |
| Loud noise from the power supply area | PSU fan or a loose component | Do not open the PSU; contact the maker or replace it |
Step 1: find the source
Turn the PC on with the side panel removed (while keeping hands and cables away from fans) and listen near each part. Monitoring software shows fan speeds and temperatures, so you can see which fan is running hard and which component is hot. A fan spinning at maximum with a cool component points to a curve or sensor problem; a fan at maximum with a hot component points to a cooling problem.
Step 2: clean the dust safely
Shut down, unplug the power cable and let the system sit. Blow dust off the filters, heatsinks and fan blades using short bursts of compressed air, holding the fan blades still so they do not over-spin. Never open the power supply, because it can hold dangerous charge even when unplugged. Clogged filters and heatsink fins are among the most common reasons a PC runs hot and loud.
Step 3: check airflow and temperatures
- Make sure intake and exhaust fans face the right direction: the usual layout draws cool air in at the front and bottom and exhausts at the rear and top.
- Keep cables out of the airflow path.
- Give the case room; a PC enclosed in a cabinet or pushed against a wall breathes poorly.
- If a cooler is badly mounted or the thermal paste has dried out, the CPU can run hot and force fans to run hard. Remounting with fresh paste is a standard step in cooler maintenance guides.
Step 4: tune the fan curve
Most motherboards let you set a fan curve in the BIOS, and many have companion software with the same options. Menu names vary by maker, so use your motherboard manual. The idea is simple: keep fans slow at low temperatures and ramp gradually instead of jumping.
| Setting | What it does | Tip |
|---|---|---|
| Fan curve slope | Sets speed against temperature | A gentler slope reduces sudden surges |
| Response time or step up/down time | Delays reaction to short spikes | Longer delay stops speed hunting |
| Zero-RPM or minimum speed | Lets fans stop or stay slow at idle | Check that a few low-speed fans are not creating a rattle at a certain RPM |
| PWM or DC mode | Chooses how the fan is controlled | Match the fan’s connector type, 4-pin for PWM, 3-pin for voltage control |
Changing BIOS options can affect stability and may void warranty terms on some changes, so make small edits, note the originals and keep conservative limits so components never overheat. If temperatures climb near the maker’s limits, raise fan speed again instead.
Step 5: graphics card noise
Graphics cards have their own fan curves, usually managed in the driver or the maker’s utility. A card that spins up for small loads may calm down with a frame rate cap, since less work means less heat. Some GPUs stop their fans at light loads by design, which is normal. If one fan on the card rattles or grinds, the cooler may be under warranty, so contact the card maker before taking it apart.
Step 6: replace worn fans
Bearings wear, especially in cheap fans and in dusty or hot environments. Replacements should match the size and connector of the original. Larger, slower fans move the same air with less noise, so a case that accepts a larger fan size may let you drop the speed. Buy from reputable makers and consult the case manual for supported sizes.
Step 7: coil whine and other noises
Coil whine is an electronic sound from inductors, often a thin, high-pitched whine that changes with load. It is typically not a defect that affects performance, though it can be annoying. Capping the frame rate or turning on a sync option often reduces it. If it is severe, ask the maker about their policy, and avoid opening the power supply yourself.
Decision table: which fix suits you
| Pick this if | Do this |
|---|---|
| Fans are loud only when gaming | Clean dust, improve airflow, smooth the curve, consider a better cooler |
| Fans are loud at idle | Check background processes, fan curve and sensor readings |
| One fan clicks or rattles | Identify and replace it |
| Noise is a buzz not tied to fan speed | Treat it as coil whine or vibration |
| PC is old and always hot | Refresh thermal paste and consider a larger case or cooler |
Common mistakes
- Spraying compressed air without holding the fan still.
- Opening the power supply to clean it.
- Setting every fan to a low fixed speed and letting temperatures rise.
- Mixing up intake and exhaust direction.
- Ignoring a grinding fan, which can fail completely and cause overheating.
When to stop and call for help
If the PC shuts down from heat, shows temperatures at the maker’s limit, smells burnt or has a failing fan inside a sealed component like a power supply, switch it off and contact the maker or a qualified technician.
Why the Guide Stops Short of a Fix
The main guide does the diagnosis well: it separates a steady whoosh from a rattle, a grinding bearing, coil whine, and case resonance, and it walks through cleaning, airflow, and fan curves. What it never does is name a part. A reader who reaches the end knows the fan curve needs smoothing and the worn fan needs replacing, but has no shortlist to buy from and no way to compare one quiet fan with another.
That gap matters because noise is a hardware property, not just a setting. Two fans at the same speed can differ by several decibels, and a cooler with a larger heatsink lets its fans spin slower for the same temperatures. The picks below are chosen on published noise figures and on fit: each one states the size, connector, and clearance check that decides whether it belongs in a given case. Work through the guide first to identify which fan is loud, then match the pick to that source. A quiet case fan will not fix a grinding CPU cooler fan, and a new cooler will not fix a rattling case fan.
More Picks Worth Considering
Noctua NF-A14 PWM 140mm Case Fan

A larger fan moves the same air at a lower speed, which is the simplest route to a quieter case. The NF-A14 PWM is a 140 mm case fan with a 4-pin PWM connector, a top speed of 1500 RPM, and a published maximum noise level of 24.6 dB(A). Its square frame uses 140 mm mounting holes on 124.5 mm spacing, so it fits cases and radiators built for standard 140 mm fans. The SSO2 bearing is rated for long service life, and Noctua backs the fan with a 6-year warranty. Use it as a front intake or rear exhaust where the case has 140 mm mounts. Check the case manual first: a case with only 120 mm mounts cannot take this fan. Pair it with a gentle fan curve and it stays quiet at idle while still moving air under load.
ARCTIC P12 PWM PST 5-Pack

Replacing every case fan at once is cheaper in a pack, and the P12 PWM PST 5-pack covers a full case in one purchase. Each 120 mm fan runs from 200 to 1800 RPM, stops below 5 percent PWM duty, and is tuned for static pressure, which suits front panels with filters and mesh. The PST connector lets each fan pass its PWM signal to the next, so several fans share one motherboard header and follow the same curve. That matters for noise: fans that follow one curve do not fight each other or surge at different temperatures. The pack suits builders who want a uniform set of fans rather than mixing brands and speeds. Confirm the case takes 120 mm fans and that the motherboard has a free PWM header or a hub before ordering, and keep the original fans as spares.
Noctua NA-FC1 PWM Fan Controller
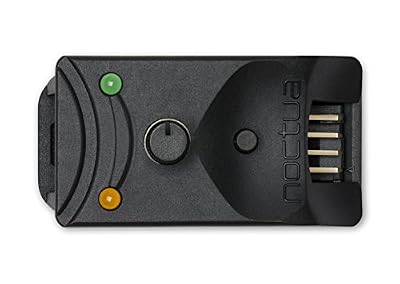
When the BIOS curve cannot be tamed, a hardware controller gives a manual override. The NA-FC1 is a compact controller for 4-pin PWM fans with a dial that sets the duty cycle from 0 to 100 percent, or trims the motherboard signal by a fixed amount. A no-stop mode keeps the fan above its stall speed so the BIOS does not report a fan failure. The box includes a 3-way splitter, so one controller drives up to three fans, and a SATA power adapter for setups where the header cannot supply enough current. It mounts inside the case and is set once, then left alone. It only works with PWM fans: a 3-pin DC fan ignores the PWM signal and runs at full speed, so check the fan connector type before buying.
be quiet! Dark Rock Pro 4 CPU Cooler
A loud stock CPU cooler is often the noisiest part of a build, and the original guide only suggests a better cooler in passing. The Dark Rock Pro 4 is a dual-tower air cooler with seven 6 mm copper heat pipes, two Silent Wings PWM fans, and a 250 W TDP rating. Its published maximum noise level is 24.3 dB(A), which is quieter than most stock coolers at full load. The larger heatsink lets the fans spin slower for the same temperatures, which is the same principle as the larger case fan above. Check two measurements before buying: the cooler is 163 mm tall, so the case needs at least that much CPU cooler clearance, and the front fan overhangs the first RAM slots, so tall memory modules may need the fan raised or moved.
How to Use These Picks in Order
Start with the fan the guide helped you identify. If it is a case fan, swap it for the NF-A14 or a P12 from the pack and set a gentle curve. If the curve itself is the problem, add the NA-FC1 and dial the speed down until the noise drops without temperatures climbing. If the CPU cooler fan is the source, replace the cooler with the Dark Rock Pro 4 and check the clearance figures first. Change one part at a time and listen after each change, so a remaining noise still has an identifiable source. If the noise is a high-pitched buzz that changes with frame rate rather than fan speed, none of these parts will help: that is coil whine, and the main guide covers it separately.
Frequently Asked Questions
Why is my gaming PC so loud all of a sudden?
A common cause is dust buildup or a fan that has started to fail. Heat from a loosened cooler or dried paste can also make fans spin harder.
Is a loud fan harmful to the PC?
A loud fan usually means the system is working to cool a hot component, which is normal under load. A grinding or clicking noise suggests a failing fan that should be replaced.
Should I run my fans at full speed?
No, a custom curve that ramps with temperature gives a better balance. Full speed is noisy and does not always reduce temperatures much beyond a certain point.
How often should I clean my PC?
It depends on your environment. Homes with pets or dust may need cleaning every few months, while cleaner rooms can go longer.
Is coil whine dangerous?
It is generally considered a cosmetic issue rather than a safety one, but if the noise is extreme, consult the manufacturer.